Revising 1: Revising Globally
Patricia Lynne
Revision is not the process of reading through your paper strengthening your sentences (which is really editing) or looking for errors right before you turn it in (which is really proofreading). Instead, revision focuses on meaning-making.
Think about the word for a moment: re-vision. It literally means “see again.” To be able to revise well, you need to be willing and able to rethink what you’ve written. It is one of the most crucial parts of your writing process. Good writers are good revisers, and revising at this level can make the biggest difference in whether or not your project succeeds.
Global revision involves looking at big-ticket items, like your thesis and organization. At this stage, you should also examine how well your draft project meets the assignment. The strategies in this chapter are designed to get you thinking about any large changes that your project may need to be successful, and so these should be done early in your revision process.
First, some general advice:
- Give yourself TIME, TIME, TIME.
- Give yourself at least 24 hours away from your writing. The more time away from your text, the easier it will be for you to see it as a reader would.
- For long, complex projects, try to start revising a week (or more) before the project is due.
- Get feedback.
- A set of eyes outside of your own can tell you what’s working and what’s not working.
- Getting feedback can also be a good way to get time away from your text.
- Start with global revisions and then move to paragraph-level changes.
- Look first for aspects of your writing that could involve major changes to your final project, like your thesis and overall organization.
- Then check the focus, development, and coherence of your paragraphs (see the next chapter for more on these areas).
Remember that you are working to develop a writing process that works for you and the flexibility to change that process as your writing tasks change.In this chapter, I am providing a range of strategies—some that I recommend highly and others that I suggest you try to see if they work for you. You need to determine for yourself which strategies work best for you. The more you practice the useful ones, the better you’ll get at using them, and the stronger your writing will become.
 Revision and Me
Revision can be some of the most challenging work on a writing project, but it can also be some of the most rewarding. Personally, I find the initial drafting to be the most difficult phase, but revising is… well, I won’t say fun, but certainly more enjoyable. I really like seeing changes that improve my text and make it communicate what I want to communicate.
Prioritizing Your Revisions
After you have had some time away from your project, start your revision process by rereading the assignment in its entirety, paying particular attention to the project’s requirements.
Then, read your draft, annotating as you go. At this stage, it can be helpful to print out your project if you can, even when the final version will be electronic. Looking at your text in a different medium can help you see things you might miss on screen.
On your first read-through, I recommend not making any changes beyond very small ones (like typos). Instead, make notes about changes you want to make.
Don’t Sweat the Small Stuff (at First)
It might be tempting to go through your paper looking for the easy changes: typos, grammatical problems, sentences that are worded strangely or don’t quite say what you mean.
However, there’s a problem with this approach. If you spend 15-20 minutes fixing these sentence-level problems in a paragraph, how likely are you to delete that paragraph, even if it turns out that the paragraph doesn’t fit your thesis? While some writers can, most students tend to write in an economic mode, so they usually are not willing to waste time that way.
Instead, put off sentence-level work until the content of your paper is solid. You’ll probably still make some sentence-level edits as you go, but don’t let those edits pull you away from content-level revision work.
Once you have given yourself a set of notes about changes to make to the draft, try prioritizing those revisions. Here are some guidelines as you make this list:
- Highest priority: Revisions that will help your project meet the assignment requirements. If your project doesn’t meet the requirements, it’s unlikely to be successful, no matter what else you do. Revisions of this caliber could include adding another point to meet a length requirement, changing or adding sources, and revising a thesis to match the purpose of the assignment.
- Second priority: Thesis changes. While sometimes you need to change your thesis so that it better fits the assignment (making it a first priority), other times you may find that the thesis you originally wrote is not exactly what you want to claim any more. You might change your mind completely, which would definitely require major revision work; however, it’s more likely that you have learned something in the process of writing your first draft that could help make your paper stronger. Since your thesis guides your whole paper, you will want to start there.
- Third priority: Major additions or deletions. Since you produced your draft, you may have determined that you missed a point you would like to explain or that you have included something that doesn’t belong. Changes like this may also affect your thesis, but not necessarily.
- Fourth priority: Large organizational revisions. Changes to the structure of your project can make your text more effective, but they can also require you to adjust your transitions between paragraphs and to rethink the order of the ideas inside paragraphs so that your reader can follow your points. Changes of this kind need to be considered if you are changing your thesis or making additions or deletions, but even if you aren’t, sometimes reorganizing your ideas can strengthen your claims.
Once you have your list, start tackling your revisions based on this priority order.
 Example: A Revision Plan
When you reread your work after some time away, you’ll see things that need changing. It can be helpful to create a bulleted list of the changes you want to make, prioritizing the big changes first. Your list might look something like this:
- Change thesis to match paper
- Split up paragraph 2
- Add evidence to paragraphs 3 and 4
- Redo conclusion
- Check citations
- Fix commas
Then, as you make the changes, you can cross them out.
 Activity: Create a Revision Plan
Read through a project that is ready for revision at least twice, making notes about changes you think you should make.
Turn those notes into a list.
Then, using the guide above, prioritize those changes.
Deleting: A Strategy to Clear Away Extraneous Material
All of us write junk sometimes. Junk includes words, sentences, or even paragraphs that don’t really belong in the final project. Maybe you were trying to meet a length requirement, or maybe you made a point that no longer seems relevant.
If something doesn’t fit when you are reading it in the revision phase, cut it out.
This can be difficult. Students usually don’t like seeing their word count drop, particularly when they feel like they have put so much effort in. I get it. But those 200 words that don’t really fit your argument aren’t going to help it succeed. Your professor will recognize them as junk, and your project will be better for deleting them and replacing them with 200 words that actually contribute to your point.
Activity: Deleting JunkUsing a project that you are revising, read your draft with an eye for what doesn’t belong and delete that material.
As you are deleting, help yourself make effective revisions by doing the following:
- Leave notes for yourself about the content you plan to add in place of the text you’re deleting. For instance, if you need to replace an example that isn’t working with a better one, make a note about any ideas you have for the replacement example.
- If you aren’t sure what to add, be sure to talk with your peers, a writing tutor, and/or your professor.
Deleting Without Really DeletingDeleting text doesn’t have to mean that your words are gone for good. There are ways of “deleting” that will let you hang onto those words in case you change your mind later.
- Save your document under a new name. For example, when I’m revising a document, I often keep the same name but add “-R1” or “-R2” to indicate which revision I’m working on. Then, when you delete, you are deleting on a copy instead of the original.
- Try highlighting that text in black so that you can’t see the actual words. Then, when you reread the text, you can see whether it makes sense to remove that material.
- Cut and paste larger deletions (like whole paragraphs) into a new document. You can save this document separately so that you don’t lose the text.
- If you are working with paper and pen, cross out the parts that need to be deleted.
Creating a Topic Sentence Outline: A Strategy to Strengthen Structure
Your thesis statement is a summary of your paper, and your topic sentences are summaries of your body paragraphs. In academic writing, your reader should be able to get the gist of your paper from reading just those parts.
Do the following activity to create a topic sentence outline (also called a reverse outline) and to review that outline, ideally with a partner. Once you have completed this review, make notes to yourself about the changes you believe are necessary.
Activity: Topic Sentence OutlineThis activity works best with a partner who is familiar with the assignment but who is not particularly familiar with your paper. You can ask someone who doesn’t know the assignment to help with this, but be sure to give them the assignment, too.
Step 1: Create the Outline (done by you)
- Copy your thesis statement from your introduction into a new document.
- Skipping lines between sentences, copy the topic sentence from each body paragraph into the same document. If you cannot find a topic sentence in a paragraph, create one or at least some kind of statement about the focus of that paragraph. Every body paragraph in your paper should have a sentence in this outline.
- Copy your restated thesis from your conclusion to the bottom of that same document.
Step 2: Review the Outline (done by your partner)
Ideally, swap with a partner to do the following steps. The instructions are written for that partner, but you can do this for yourself.
- Read the thesis statement, and check the assignment. Does the thesis statement meet the purpose of the assignment?
- Place the answer to this question on the line after the thesis statement in a different color font.
- If you think changes need to be made to the thesis statement so that it meets the assignment, suggest those changes here, too.
- For each topic sentence, create a color-coded match to the thesis statement to identify the part of the thesis statement that each topic sentence is addressing:
- Each in a different color, highlight the parts of the thesis statement that you expect to see explained in more detail in the paper.
- Highlight each topic sentence in the color that corresponds to that part of the thesis statement. Note: You might have more than one topic sentence that needs to be the same color. It is also possible to have topic sentences that refer to multiple parts of the thesis. Both of these situations are not necessarily problems.
- If there are any topic sentences that do not have a counterpart in the thesis statement, do not color them, but give the author at least one suggestion about how to revise. Remember that one possible option is to delete the paragraph attached to that topic sentence.
- Compare the first and last versions of the thesis statement. Are there any substantial differences between them? If so, make a note of those differences after the restated thesis at the bottom.
- Look over the outline, including both versions of the thesis statement, and try rewriting the thesis statement in your own words at the bottom of the page. Do this in a different font/color so that the author knows this one is yours.
Step 3: Evaluate the Results (done by you)
Read through the responses you have received, paying particular attention to the following:
- Does your current thesis statement match the assignment? If not, make notes about how to revise it.
- Does your current thesis statement match the order of the paragraphs in your paper? If not, make notes about rearranging either the points in the thesis statement or the paragraphs in the paper.
- Do you have any paragraphs with topic sentences that aren’t clearly connected to your thesis statement? If so, check to see whether these should be deleted or whether the topic sentence should be revised so that the connection is clearer.
- Look at any comments about your restated thesis from your conclusions. Make notes about any changes you want to make based on the feedback on that sentence.
- Does the thesis statement written by your partner match your main idea in the paper?
- If so, consider whether any of the ideas in that revised thesis statement could be incorporated into your existing thesis statement.
- If not, make notes about what isn’t accurate and whether there are ways you could adjust your thesis to make your point clearer for your reader.
And then, of course, work on making these changes!
Reordering Your Paper: A Strategy to Strengthen Organization
Sometimes, it helps to pull your paper apart and get another opinion about how to put it back together. It can be easy to get stuck in the organization that we originally devise for a project, but that order is not necessarily the best or only option. This strategy is intended to give you feedback specifically on the order you have created.
Activity: Pile O’ParagraphsAs with the previous strategy, this activity works best when you work with a partner. Unlike the last one, though, knowing the assignment is not crucial, so readers who aren’t familiar with the assignment can be helpful here.
For this strategy, I encourage students to use a physical copy of their paper. Print it out, and use scissors and tape. Even for writers who work well on screen, this strategy can help you see your paper as building blocks that don’t necessarily go in the order you originally thought.
Step 1A: Prepare Your Draft (print version; scissors and tape needed; done by you)
- Print out a clean (no annotations or comments), single-sided copy of your paper.
- Cut your paper apart into paragraphs.
-
- Cut off your heading and title from the beginning and your Works Cited or References list from the end of your paper.
- Cut off any headers and page numbers.
- If a paragraph runs across a page break, tape the parts of the paragraph together.
- Mix up your paragraphs and stack them up so that you have a pile of paragraphs in a random order.
Step 1B: Prepare Your Draft (electronic version; done by you)
- Save a copy of your paper under another name so that you have the original version intact.
- Delete your header, your title, and your Works Cited or References list.
- Rearrange the order of the paragraphs, including the introduction and conclusion. The point is to mix them up so the entire essay is a jumble of paragraphs.
Step 2: Organize the Pile O’Paragraphs (done by your partner)
- Put the paragraphs in an order that makes sense to you.
- Don’t worry about being “right.” Instead, think about the logic of the paper as a whole. As a reader, what do you expect to read first, second, etc.?
- Check paragraphs that are a full page long or more. If you see a paragraph that seems too long, see if you can find a place to split that paragraph. If you do, either cut the paragraph apart (print) or and add a paragraph break (electronic). In a comment or note right at that paragraph break, make any suggestions you have for transitions that would help a reader understand how these parts are related.
- Make connections among short paragraphs that seem to belong together. If you see paragraphs that are too short and that belong together (or that belong with another longer paragraph), tape those pieces together (print) or put them together in a paragraph (electronic) in the order you think the ideas should appear. In a comment or note where you joined the paragraphs, make any suggestions for helping the blended paragraph hold together well, including any additions or deletions you think are needed.
- Make suggestions for short paragraphs that don’t connect. If you see a short paragraph that doesn’t belong with another paragraph but that you think is important enough to keep, make suggestions for developing the paragraph more fully. You should still place that paragraph where you think it belongs logically.
- Point out junk. If you see a paragraph that you think doesn’t belong, make a note of that and why you think it shouldn’t be in the paper. Put this paragraph at the bottom of the pile (print) or leave that paragraph at the very end with some spaces between it and the rest of the paper (electronic).
- Feel free to leave your partner other notes, but keep the focus on the organization.
- Once you have an order that you think works, number the paragraphs (print) or save the file (electronic), and return the version with your organization to your partner.
Part 3: Review the Organization (done by you)
- Compare the order in which you received the paper from your partner with the order it was in before you jumbled it. Make note of any differences and whether or not you like the changes.
- Ask your partner about any of their decisions that you want to understand better.
- Write up notes on what, if anything, you are going to change based on this feedback.
Balancing Your Evidence and Explanation: A Strategy to Strengthen Development
This strategy is designed to help you determine whether you are providing your reader with enough evidence and enough explanation to make your case. While much of the actual development work needs to be done in your body paragraphs (and so we’ll talk about that in the next chapter), it can be helpful to know if your paper as a whole is out of balance.
Keep in mind that most college-level academic papers include between 25% and 50% evidence. These percentages are rough and will depend on the type of assignment you have. For example, summaries will have a much higher percentage of evidence.
Activity: Performing an Evidence/Explanation Balance AnalysisUnlike some of the activities, I’ve suggested, this one tends to work better if you do it yourself. This is because you know best which sentences (or parts of sentences) are your ideas and which are coming from sources.
Part 1: Highlighting
Using the highlighting feature in your word processor or actual highlighters on print versions, do the following:
- Highlight or otherwise mark all the supporting evidence in the body of your paper in one color. For the purposes of this analysis, ignore your introduction and conclusion.
- From textual sources, this would include quotations and paraphrases, facts, examples, and background information. Include the attributive tags and citations in these highlights.
- You can also do this with evidence from personal experience and observations or data that you have personally collected. These would be considered evidence in projects that don’t rely heavily on published sources.
- Using a different color, highlight or otherwise mark differently all of the explanations of that evidence that you have provided. This material should all be coming from your own ideas. Note: You may have sentences that are part evidence and part explanation. That is perfectly fine.
- Be sure that you have highlighted every sentence in the body of your paper.
Part 2: Analyzing Your Balance
- Determine the rough percentage.
-
- You can eyeball this by scrolling out the view on your screen so that you can see all of the pages in your project.
- If you are working on a print version, you can lay out all of the pages side-by-side.
- If you’d like to be more precise, you can count up the number of lines of text in your paper and then the number of lines of each color (though this probably isn’t necessary and could be a waste of time).
- If the percentage is weighted too heavily in favor of either evidence or explanation, make notes about what you might alter to bring the project closer to where you want it, keeping these notes handy when you shift to paragraph-level revisions.
- If there are particular paragraphs that may be too heavy in one or the other, make note to examine those paragraphs in more detail when you are revising paragraphs. Keep in mind that sometimes you will need paragraphs that are heavily weighted in one direction or the other, so specific paragraphs may not be a problem, as long as the overall balance is what you want.
 Key Points: Revising Globally
- Strong global revisions can make the biggest difference in the success of your project.
- Global revision focuses on big-ticket items like your thesis, organization, and overall development. This is also a good moment to make sure that your project meets the assignment requirements.
- A good starting point is to read over your draft and make notes about changes you think would improve your work. Once you have those notes, turn them into a list, and prioritize them so that you are working on the biggest changes first.
- When you revise at the global level, you want to check the following areas (activity suggestions above):
- Delete any material that isn’t contributing to your point or to the purpose of the assignment.
- Make sure that cover all of the topics in your thesis statement and that you do so in an order that matches your thesis statement.
- Make sure that the order of ideas in your paper is clear and logical.
- Make sure that your evidence and your explanations are balanced appropriately for the type of paper you are writing.
Text Attributions
The introduction to this chapter, “Prioritizing Your Revisions,” and “Deleting: A Strategy to Clear Away Extraneous Material” were revised with the help of Tia Lidonde and Joseph Payne, students in my class during Spring 2022.
Cornell Note-taking
The Cornell Note-Taking System is a powerful tool for taking useful notes.
This format allows your brain to work in several different ways and helps with effective learning and retention.
The video below explains what Cornell Notes are.
https://youtu.be/nX-xshA_0m8
The video below explains how to USE Cornell Notes (spoiler alert: there is not one right way to use them!).
https://youtu.be/nX-xshA_0m8
The Cornell Note-Taking System was originally developed by Cornell education professor, Walter Pauk. Prof. Pauk outlined this effective note-taking method in his book, How to Study in College (1).
- Pauk, Walter; Owens, Ross J. Q. (2010). How to Study in College (10 ed.). Boston, MA: Wadsworth. ISBNLinks to an external site. 978-1-4390-8446-5Links to an external site.. Chapter 10: "The Cornell System: Take Effective Notes", pp. 235-277
- This page taken from: https://lsc.cornell.edu/how-to-study/taking-notes/cornell-note-taking-system/
Warm-up
What’s your overall view or philosophy around new technologies and tech tools? Eg., are you an ‘early adopter’ or prefer to wait until the bugs are worked out? Are you excited for our new robot overlords or are you a humanist through and through?
AI 'Pulse Check'
- Who is using GenAI?
- What are you using it for?
- What would you like to?
- What don’t you want to use it for?
- How do you feel about me using AI with our class work?
- What else?
Review Academic Code, Section V
Pima Community College Academic Integrity Code
URL: https://www.pima.edu/student-resources/student-policies-complaints/docs/academic-integrity-code.pdf
Review AI Guidelines
Students shall:
- Learn how to use AI text generators and other AI-based assistive resources (AI tools) to enhance rather than damage their developing abilities as writers, coders, communicators, and thinkers.
- Give credit to AI tools whenever used, even if only to generate ideas rather than usable text or illustrations.
- When using AI tools on assignments, add an appendix showing (a) a description of precisely which AI tools were used (e.g. ChatGPT, Grammarly, etc.), (b) an explanation of how the AI tools were used (e.g. to generate ideas)
- Employ AI detection tools and originality checks prior to submission, ensuring that their submitted work is not mistakenly flagged.
- Use AI tools wisely and intelligently, aiming to deepen understanding of subject matter and to support learning.
The instructor shall:
- Ensure fair grading for both those who do and do not use AI tools.
- Treat work by students who declare no use of AI tools as the baseline for grading.
- Employ tools and strategies to evaluate the degree to which AI tools have likely been employed.
- Impose a significant penalty for low-energy or unreflective reuse of material generated by AI tools and assigning zero points for merely reproducing the output from AI tools.
- Employ AI tools responsibly and transparently in the performance of their teaching responsibilities
For Further Reading
A Student Guide to Navigating College in the Artificial Intelligence Era
The Writing Process
When we talk about "the writing process" what we really mean is a series of steps that help you organize your thoughts, develop your ideas, and refine your work into a polished piece of writing. It usually begins with prewriting, where you brainstorm ideas, research your topic, and plan your approach. This stage is about exploring your thoughts freely, jotting down anything that comes to mind, and considering your audience and purpose. Once you have a clear idea, you'll move on to drafting, where you start putting your ideas into sentences and paragraphs. This is where you build the structure of your piece, focusing on getting your ideas down rather than making everything perfect right away.
| Brainstorming | Drafting | Revising | Editing | Publishing |
After drafting, you enter the revision stage, which is all about improving the content and clarity of your writing. You'll rework your ideas, reorganize sections, and make sure your arguments or narrative flow logically. Following that, you'll move on to editing, where you focus on the finer details like grammar, punctuation, and word choice. This step ensures your writing is clear, concise, and error-free. Finally, the publishing or submission stage is when you prepare your work for its final presentation, whether that’s handing it in to your professor, sharing it with peers, or publishing it online. As with most processes, it's normal to revisit earlier stages multiple times to refine your work.
There are a number of ways to organize your brainstorms get started writing, and the methods you use to organize, draft, and finalize your work are also unique to you as a writer. As such, it is important to find a way that works for you and this class is meant to help you with that. Below you will find four main ways to begin writing, including a mind map, and outline, freewriting, and using a grid.
Brainstorming: Four Ways to Begin
https://youtu.be/HSufG-AIQYo?si=DxGrlwn7nw0GFF9k
Mind Map
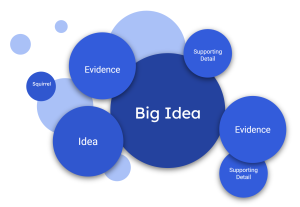
Mind mapping is a visual tool that helps you organize your thoughts and ideas by connecting them in a structured way. It starts with a central idea or topic, and from there, you branch out into related subtopics, each represented by a word or phrase. These subtopics can further branch out into more detailed points, creating a web-like structure that shows how your ideas are connected. Many writers like this method because the shapes show how the ideas relate or connect, and writers can find a focused topic from the connections mapped. Using idea mapping, you might discover interesting connections between topics that you had not thought of before.
To create an idea map, start with your general topic in a circle in the center of a blank sheet of paper. Then write specific ideas around it and use lines or arrows to connect them together. Add and cluster as many ideas as you can think of.
Outline
An outline is a structured plan for organizing your ideas before you start writing an essay or paper. It typically starts with your main topic or thesis at the top, followed by a hierarchical arrangement of main points and subpoints that support your thesis. Each main point is usually broken down into smaller details or evidence that you will cover in your writing. Creating an outline helps you to clearly see the overall structure of your essay, ensuring that your ideas flow logically and that you cover all necessary points. It serves as a roadmap to guide your writing process, making it easier to stay focused and organized.
There are two types of formal outlines: the topic outline and the sentence outline. You format both types of formal outlines in the same way.
- Place your introduction and thesis statement at the beginning, under roman numeral I.
- Use roman numerals (II, III, IV, V, etc.) to identify main points that develop the thesis statement.
- Use capital letters (A, B, C, D, etc.) to divide your main points into parts.
- Use arabic numerals (1, 2, 3, 4, 5, etc.) if you need to subdivide any As, Bs, or Cs into smaller parts.
- End with the final roman numeral expressing your idea for your conclusion.
Here is what the skeleton of a traditional formal outline looks like. The indention helps clarify how the ideas are related.
- Introduction
- Thesis statement
- Main point 1 → becomes the topic sentence of body paragraph 1
- Main point 2 → becomes the topic sentence of body paragraph 2
- Main point 3 → becomes the topic sentence of body paragraph 3
- Conclusion
Freewriting
Freewriting is a writing technique where you write continuously for a set period without worrying about grammar, punctuation, or spelling. The goal is to get your thoughts down on paper without censoring yourself or stopping to correct mistakes. This method helps you overcome writer’s block, discover new ideas, and develop your thoughts more fully.
Try writing for 3-5 minutes without stopping and try not to worry about grammar, spelling, or punctuation. Instead, write as quickly as you can. If you get stuck, just copy the same word or phrase over and over until you come up with a new thought.
When writing quickly, try not to doubt or question your ideas. Allow yourself to write freely and unselfconsciously. Once you start writing with few limitations, you may find you have more to say than you first realized. Since freewriting encourages a flow of ideas without judgment, it can be a valuable way to generate content that you can later refine and organize into a more structured piece. Your flow of thoughts can lead you to discover even more ideas about the topic. Freewriting may even lead you to discover another topic that excites you even more.
https://youtu.be/4O0EMX0nnl4?si=LeyARtpwzI210uZZ
Grid
A grid is a brainstorming tool that helps you organize and compare different ideas, topics, or aspects of your writing. It typically consists of a table with columns and rows where you can list out different categories or criteria in the columns and fill in related ideas or details in the rows. This method allows you to visually organize your thoughts and see how different elements relate to one another. For example, you might use a grid to compare themes across multiple texts, explore pros and cons of various arguments, or brainstorm different angles on a topic. Using a grid can help you identify patterns, gaps, and connections in your ideas, making it easier to decide what to focus on when you start writing.
This doesn’t need to be anything too formal; just jot down the main points you want to make, any supporting evidence or examples you plan to use, and the order in which you want to present them. An outline will serve as your roadmap and help you stay focused as you write.
Example: Rhetorical Strategies Grid
| Passage (Quote or Paraphrase) | Passage | Passage | |
| Idea or Example | |||
| Idea or Example | |||
| Idea or Example | “Though many kinds of physical work don’t require a high literacy level, more reading occurs in the blue-collar workplace than is generally thought, from manuals and catalogues to work orders and invoices, to lists, labels, and forms. With routine tasks, for example, reading is integral to understanding production quotas, learning how to use an instrument, or applying a product. Written notes can initiate action, as in restaurant orders or reports of machine malfunction, or they can serve as memory aids.” |
This passage represents a claim of fact because Mike Rose shows that while many people don’t think that those in blue-collar jobs read much at work, this is actually false. In truth, Mike Rose says, blue-collar workers read quite a lot, especially while completing the routine tasks of their jobs. |
This claim of fact about how much a blue-collar worker reads on the job contributes to the audience’s overall understanding that blue-collar workers actually do exert mental energy on tasks at work that illustrate their critical thinking and literacy skills. After reading this passage, the intended audience would see that there are many ways of reading that we don’t normally think about, and that blue-collar workers often engage in these ways of reading. |
Example: Research Synthesis Grid
| Source One | Source Two | Source Three | |
| Idea | |||
| Idea | |||
| Idea | Cornelsen - Women accredited the WASP program for opening new doors, challenging stereotypes, and proving that women were as capable as men (p. 113) - Women could compete with men as equals in the sky because of their exemplary performance (p. 116) - WASP created opportunities for women that had never previously existed (p. 112) - Women’s success at flying aircrafts “marked a pivotal step towards breaking the existing gender barrier” (p. 112) |
Stewart - WAAC (Women’s Army Auxiliary Corp) was 1st chance for women to serve in army, given full army status in 1943 as WAC (p. 28) - Needs of the war were so great that women’s traditional social roles were ignored (p. 30) - Military women paid well for the time period and given benefits if they became pregnant (p. 32) - The 1940’s brought more opportunities to women than ever before (p. 26) |
Scott - Women born in the 1920’s found new doors open to them where they once would have encountered brick walls (p. 526) -Even women not directly involved in the war were changing mentally by being challenged to expand their horizons because of the changing world around them (p. 562) - War also brought intellectual expansion to many people (p. 557) |
What is Information Literacy?
Information Literacy, as a term, means understanding, finding, evaluating, and using information through intentionally applying reasoning, discernment, and decision making skills.
The Chartered Institute of Library and Information Professionals defines information literacy as “knowing when and why you need information, knowing where to find it, and how to evaluate, use and communicate it in an ethical manner.”
Practicing information literacy engages a set of skills that enable us to critically assess the quality and credibility of information from various sources, including digital, print, and media. Information literacy is crucial in our world, where of course, the sheer volume of available information can be overwhelming and not always reliable or accurate.
Key components of information literacy
- Identifying Information Needs: Understanding what information is needed for a particular purpose.
- Finding Information: Knowing how and where to locate relevant information using a variety of resources such as databases, libraries, and the internet.
- Evaluating Information: Assessing the credibility, accuracy, and reliability of the information found, considering factors such as the source, bias, and context.
- Using Information: Effectively applying the information to solve problems, make decisions, or create new knowledge, while also respecting ethical and legal considerations, such as avoiding plagiarism.
- Communicating Information: Presenting information in a clear, organized, and appropriate manner for the intended audience.
Information Literacy Models
There are several established models for information literacy that provide frameworks and guidelines for teaching and practicing information literacy skills.
The Big6 is one of the most widely known information literacy models. It breaks down the information literacy process into six steps.
The Association of College and Research Libraries (ACRL) Framework for Information Literacy for Higher Education describes the concept of information literacy as a spectrum of abilities rather than a set of skills
The CRAAP (Currency, Relevance, Authority, Accuracy, and Purpose) test method has recently come under scrutiny but has been a common strategy across higher education
The SIFT method is an evaluation strategy developed by digital literacy expert, Mike Caulfield, to help determine whether online content can be trusted for credible or reliable sources of information
https://youtu.be/SHNprb2hgzU?si=AmvuEA5J23ssrsPl
Understanding Information Biases
Sometimes when we pick and choose information, our own biases and lived experiences lead us to seek certain sources over others. It is human to have bias, but understanding them when we seek information is crucial in a well-rounded approach to learning something new.
One type of bias we should consider is confirmation bias, which occurs when we only seek out evidence that confirms what we already believe or interpret evidence in a way that confirms our existing beliefs.
Let’s apply these ideas to the common practice of searching the internet for information. By recognizing cognitive biases, you can find the most accurate and reliable information:
- First, search results for “are we eating too much protein”
- Next, search results for “protein nutrition”
Notice the difference between the search terms “are we eating too much protein” and “protein nutrition.” The first gives results that indicate eating too much protein is bad. Authors that have this viewpoint are more likely to use the words “too much protein” than people who do not. The search “protein nutrition” gives results that are more neutral. Only using terms that frame a topic a certain way will produce biased results. It is similar to asking a leading question (Did you have a great day?) vs. a neutral question (How was your day?).
When reading information that opposes our personal viewpoints, we may be more likely to dismiss an author’s arguments. Since false consensus bias leads us to believe that others think the same way we do, it can be hard to accept that others have different beliefs that are also valid.
To avoid this type of bias, called a false consensus bias, approach the information like a scientist with a hypothesis. Acknowledge your hypothesis and be willing to accept that the hypothesis may be wrong. In science, a wrong hypothesis is celebrated as learning something new. I encourage us to let it be the same when exploring information and developing information literacy.
Information Literacy in-Depth
https://youtu.be/GoQG6Tin-1E?si=lRdBFgUv65rAMoPk
https://youtu.be/q-Y-z6HmRgI?si=UlvKsoxfPeTFZCYG
Information biases material adapted from: First-Year Composition Copyright © 2021 by Jackie Hoermann-Elliott
Because of all their influence, you might worry that research questions are very difficult to develop. Sometimes it can seem that way. But we'll help you get the hang of it and, luckily, none of us has to come up with perfect ones right off. It's more like doing a rough draft and then improving it. That's why we talk about developing research questions instead of just writing them.
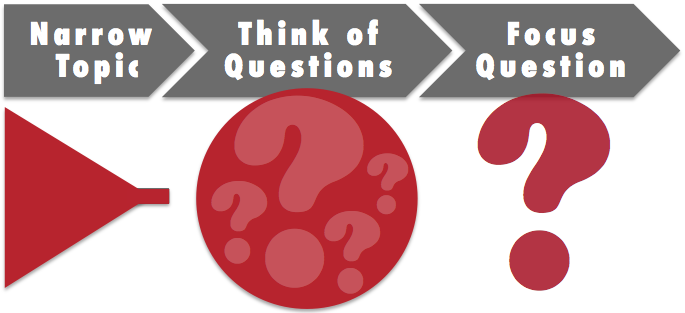
Steps for Developing a Research Question
The steps for developing a research question, listed below, can help you organize your thoughts.
Step 1: Pick a topic (or consider the one assigned to you).
Step 2: Write a narrower/smaller topic that is related to the first.
Step 3: List some potential questions that could logically be asked in relation to the narrow topic.
Step 4: Pick the question that you are most interested in.
Step 5: Change the question you’re interested in so that it is more focused and specific.
ACTIVITY: Following the Steps
MOVIE: Developing Research Questions
As you view this short video on how to develop research questions, think about the steps. Which step do you think is easiest? Which do you think is the hardest?
Practice
Once you know the steps and their order, only three skills are involved in developing a research question:
- Imagining narrower topics about a larger one,
- Thinking of questions that stem from a narrow topic, and
- Focusing questions to eliminate their vagueness.
Every time you use these skills, it’s important to evaluate what you have produced—that's just part of the process of turning rough drafts into more finished products.
Maybe you have a topic in mind but aren't sure how to form a research question around it. The trick is to think of a question related to your topic but not answerable with a quick search. Also, try to be specific so that your research question can be fully answered in the final product for your research assignment.
ACTIVITY: Thinking of Questions
For each of the narrow topics below, think of a research question that is logically related to that topic. (Remember that good research questions often, but not always, start with “Why” or “How” because questions that begin that way usually require more analysis.)
Topics:
- U.S. investors’ attitudes about sustainability
- College students’ use of Snapchat
- The character Scout in To Kill a Mockingbird
- Nature-inspired nanotechnologies
- Marital therapy
After you think of each research question, evaluate it by asking whether it is:
- Logically related to the topic
- In question form
- Not answerable with a quick Google search
- Specific, not vague
Sometimes the first draft of a research question is still too broad, which can make your search for sources more challenging. Refining your question to remove vagueness or to target a specific aspect of the topic can help.
ACTIVITY: Focusing Questions
The first draft research questions below are not focused enough. Read them and identify at least one area of vagueness in each. Check your vagueness with what we identified. It’s great if you found more than we did because that can lead to research questions of greater specificity. See the bottom of the page for our answers.
First Drafts of Research Questions:
- Why have most electric car company start-ups failed?
- How do crabapple trees develop buds?
- How has NASA helped America?
- Why do many first-time elections soon after a country overthrows a dictator result in very conservative elected leaders?
- How is music composed and performed mostly by African-Americans connected to African-American history?
ACTIVITY: Developing a Research Question
ANSWER TO ACTIVITY: Focusing Questions
Some answers to the “Focusing Questions” Activity above are:
Question 1: Why have most electric car company start-ups failed?
Vagueness: Which companies are we talking about? Worldwide or in a particular country?
Question 2: How do crabapple trees develop buds?
Vagueness: There are several kinds of crabapples. Should we talk only about one kind? Does it matter where the crabapple tree lives?
Question 3: How has NASA helped America?
Vagueness: NASA has had many projects. Should we should focus on one project they completed? Or projects during a particular time period?
Question 4: Why do many first-time elections soon after a country overthrows a dictator result in very conservative elected leaders?
Vagueness: What time period are we talking about? Many dictators have been overthrown and many countries have been involved. Perhaps we should focus on one country or one dictator or one time period.
Question 5: How is music composed and performed mostly by African-Americans connected to African-American history?
Vagueness: What kinds of music? Any particular performers and composers? When?
