Module 3: Aristotelian Logic
3.5 Categorical Syllogisms
As we are by now well aware, Aristotelian Logic limits itself to evaluating arguments all of whose propositions— premises and conclusion—are categorical (in A, E, I, or O format.) Now it’s time to examine the logical form of the arguments tested for validity.
3.5.1 Anatomy of a Categorical Syllogism
Aristotelian Logic restricts its evaluation of validity to categorical syllogisms. This is a special kind of argument, meeting these conditions:
A categorical syllogism is a deductive argument consisting of three categorical propositions (two premises and a conclusion); collectively, these three propositions feature exactly three classes; each of the three classes occurs in exactly two of the propositions.
That’s a mouthful, but an example will help make it clear. Here is a (silly) categorical syllogism:
Some omnivores are golfers.
/∴ Some chipmunks are golfers.
This argument meets the conditions in the definition: it has three propositions; there are exactly three classes involved (chipmunks, omnivores, and golfers); and each of the three classes occurs in exactly two of the propositions (check it and see).
There is some special terminology for the class terms and premises in categorical syllogisms.
- Each of the three class terms has a special designation:
- The so-called major term is the term that appears in predicate position in the conclusion; in our silly example, that’s ‘golfers’.
- The minor term is the term that appears in subject position in the conclusion; in our example, that’s ‘chipmunks’.
- The middle term is the other one, the one that appears in each of the premises; in our example, it’s ‘omnivores’.
- The premises have special designations as well.
- The major premise is the one that has the major term in it; in our example, that’s ‘Some omnivores are golfers’.
- The minor premise is the other one, the one featuring the minor term; in our example, it’s ‘All chipmunks are omnivores’.
There is one final restriction: categorical syllogisms must be written in standard form. This means listing the premises in the correct order, with the major premise first and the minor premise second. If you look at our silly example, you’ll note that it’s not in standard form. To fix it, we need to reverse the order of the premises:
All chipmunks are omnivores.
/∴ Some chipmunks are golfers.
An old concern may arise again at this point: in restricting itself to such a limited class of arguments, doesn’t Aristotelian Logic run the risk of not being able to evaluate lots of real-life arguments that we care about? The response to this concern remains the same: while most (almost all) real-life arguments are not presented as standard form categorical syllogisms, a surprising number of them can be translated into that form. Arguments with more than two premises, for example, can be rewritten as chains of two-premise sub-arguments. As was the case when we raised this concern earlier, we will set aside the messy details of exactly how this is accomplished in particular cases.
Check Your Understanding
3.5.2 Logical Form
As we said at the outset of our exploration of deductive logic, there are three things such a logic must do:
- Tame natural language
- Precisely define logical form
- Develop a way to test logical forms for validity
Much of this unit has been concerned with the first step. Now we are ready for steps 2 and 3.
The logical form of a categorical syllogism is based on two features of the argument: its ‘mood’ and its ‘figure.’
First, mood:
The mood of a syllogism is determined by the types of categorical propositions contained in the argument, and the order in which they occur.
To determine the mood, put the argument into standard form, and then simply list the types of categoricals (A, E, I, O) featured in the order they occur. Let’s do this with our example:
All chipmunks are omnivores.
/∴ Some chipmunks are golfers.
From top to bottom, we have an I, an A, and an I. So the mood of our argument is IAI. It’s that easy.
It turns out that there are 64 possible moods—64 ways of combining A, E, I, and O into unique three-letter combinations, from AAA to OOO and everything in between.
Now, the feature we call figure:
The figure of a categorical syllogism is determined by the arrangement of its terms. Given the restrictions of our definition, there are four different possibilities for standard form syllogisms. We will list them schematically, using these conventions:
- ‘S’ stands for the minor term (i.e., subject of the conclusion)
- ‘P’ stands for the major term (i.e., predicate of the conclusion)
- ‘M’ stands for the middle term.
Notice how the positions of the middle term can visually define each figure:

Note: Be aware that the word ‘figure’ with respect to logical form of categorical syllogisms is used in a specific, precising sense. The word ‘figure’ also has a lexical meaning, for example, in naming images in this course content. Recall our brief introduction to definition types in Unit 2!
Again, the only thing that determines figure is the arrangement of terms—whether they appear in subject or predicate position in their premises. In our schemata for a given statement, the letter listed first indicates the term is in the subject position; that it appears second indicates that it’s in the predicate position. So, in the first figure, in the major premise (the first one), the middle term (M) is in subject position and the major term (P) is in predicate position. Notice that for all four figures, the subject and predicate of the conclusion remains the same: this is because, by definition, the minor term (S) is the subject of the conclusion and the major term (P) its predicate.
Returning to our example, we can determine its figure:
All chipmunks are omnivores.
/∴ Some chipmunks are golfers.
The easiest approach is to focus on the middle term, the one that appears in each of the premises—in this case, ‘omnivores’. It occurs in subject position in the major premise, then predicate position in the minor premise. Scanning the four figures, just look for the one that has ‘M’ listed in first position of the first premise, then second position in the second premise. That’s the first figure. (Figure 1).
So the mood of our sample argument is IAI, and it’s in the first figure. Logical form is just the mood and figure, by convention listed like this: IAI-1 (the mood, a dash, then a number between 1 and 4 for the figure).
There are 4 figures and 64 moods. That gives us 256 possible logical forms. It turns out that only 15 of these are valid. We need a way to test them for validity, and we will turn next to that task.
Check Your Understanding
3.5.3 The Venn Diagram Test for Validity
To test syllogistic forms for validity using Venn diagrams, we proceed in three steps.
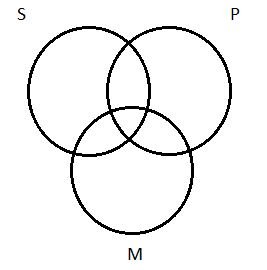
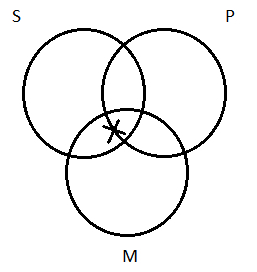
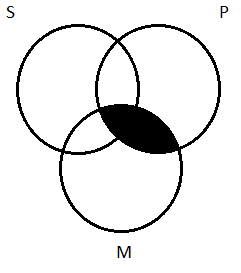
Step 1: Draw three overlapping circles, like this:

That gives us one circle for each of the three terms in the syllogism:
-
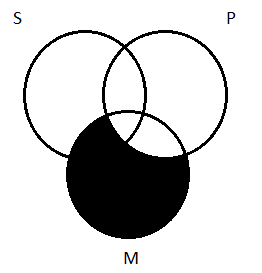
- The minor term (Subject term of the conclusion) is labeled S
- The major term (Predicate term of the conclusion) is labeled
- The middle term is labeled M
For our work, we will adopt the convention of placing the circle for the subject class (S) at the upper left, predicate class (P) at the upper right, and middle term (M) at the center bottom. (Some texts by convention place the middle-term class is on top, with the subject- and predicate-term classes on the bottom.)
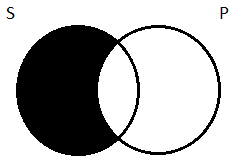
Step 2: On this three-circle diagram, depict the assertions made by each of the two premises; use the standard shading and Xs as appropriate for A, E, I, or O propositions. Here’s a reminder of the Venn markups by statement type:

Each premise will be a proposition concerning only two of the three terms (S, P, and M). Focus just on the circles for those two terms as you choose the correct mark-up (shading or X) for each premise.
In marking our Venn diagram in Step 2 of our test for validity, there are two important guidelines to keep in mind:
-
- Rule of Thumb: Always handle universal (A and E) premises before particular (I and O) ones when there is one of each.
- Convention: In cases of indeterminacy (that is, where it’s not clear in which area an X should be drawn), draw that X straddling the boundary line between the areas. (More on “indeterminacy” is coming up.)
Step 3: After the premises have been depicted on the three-circle diagram, our mark-up is complete. We then look at the finished product and ask whether the picture entails the truth of the conclusion. To do this, look at the two circles involving the Subject and Predicate classes. Is this a picture of the Venn diagram for the proposition stated by the conclusion? If it is, the form is valid; if it is not, it is invalid.
To demonstrate how this process works, we will work through some examples.
Example 1: Testing AAA-1 for Validity
Let’s start at the beginning (alpha-numerically) and test syllogistic form AAA-1 for validity. Before we get started with our test steps, we need to see what this argument form looks like, schematically. Its mood (AAA) and its figure (1) provide these details.
All three of this argument form’s propositions are As, universal affirmatives, so they’re all of the form ‘All __ are __.’ So the mood tells us that we have:
All __ are __.
All __ are __.
/∴ All __ are __.
Next, we need to know where the S (subject term), P (predicate term), and M (middle term) belong in those blank spaces we left in the A-type statements. The syllogism’s figure tells us where the Ss, Ps, and Ms belong. We’re working on AAA-1: so, we have Figure 1. By scrolling back just a bit to the picture of the four Figures in section 3.5.2. (‘figure 3.5-1’), we see that Figure 1 looks like this:
MP
SM
SP
So AAA-1 looks like this, schematically:
All M are P.
All S are M.
/∴ All S are P.
To test this form for validity, we start with Step 1, and draw our three overlapping circles, one each to represent S, P, and M:

Step 2 involves depicting the premises on this diagram. (The rule about depicting universal premises first does not apply here since both premises are universal.)
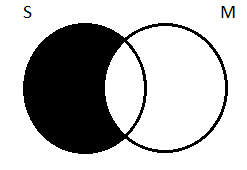
We will start with the major premise: All M are P. To keep our focus on the circles that represent M and P, we visualize a regular two-circle Venn diagram, that would look like this standard diagram of an A-type proposition:
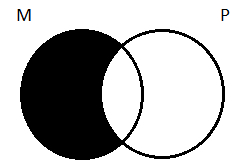
The trick is to transfer this two-circle diagram onto the three-circle one. In doing so, we keep in mind that all the parts of M that are outside of P must be shaded. That gives us this:
Notice that in the course of shading out the necessary regions of M, we shaded out part of S. That’s OK. Those members of the S class are Ms that aren’t Ps; there can be no such thing, they do not exist.
Next, we depict the minor premise: All S are M. With two circles, it would look like this:
Transferring that onto the three-circle diagram means shading all the parts of S outside of M:
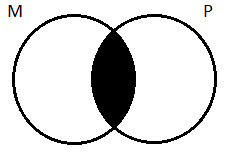
Step 2 is complete: we have depicted the assertions made by the premises. Now, in step 3 we ask whether this diagram guarantees the truth of the conclusion. Well, our conclusion is All S are P. In a two-circle diagram, that looks like this:
Does our three-circle diagram guarantee the truth of All S are P? Focusing on the S and P circles, and comparing the two diagrams, there’s a bit of a difference: part of the area of overlap between S and P is shaded out in our three-circle diagram, but it isn’t in the two-circle depiction. But that doesn’t affect our judgment about whether the diagram guarantees that All S are P. Remember, this can be thought of as a claim that a certain kind of thing doesn’t exist—an S that’s outside the P circle. If there are any Ss (and there may not be), they will also be Ps. Our three-circle diagram does in fact guarantee this. There can’t be an S that’s not a P; those areas are shaded out. Any S you find will also be a P; it’ll be in that little unshaded region in the center where all three circles overlap.
So, since the answer to our question is “yes”, the syllogistic form AAA-1 is valid!
Note: Here’s a trivial fact: all 15 of the valid syllogistic forms were given mnemonic nicknames in the Middle Ages to help students remember them. AAA-1 is called “Barbara”. All the letters in the name had some meaning: the vowels indicate the mood (AAA); the other letters stand for features of the form that go beyond our brief investigation into Aristotelian Logic.
Supplement Your Learning
You may walk through a step-by-step summary of Example 1 with this slide presentation: Venn Diagram Test for Validity – Example 1 . Link to it here or find it in the course table of contents at the end of Module 3. If you found the text description of this example complicated or confusing, scrolling through the slides at your own pace and reading each slide carefully may help clarify the Venn Diagram test for validity.
Before we move to our next example, we should reflect for a moment on why this method works. We draw a picture that depicts the assertions made by the premises of the argument. Then we ask whether that picture guarantees the conclusion. This should sound familiar. We’re testing for validity, and by definition, an argument is valid when its premises guarantee its conclusion; that is, IF the premises are true, then the conclusion must also be true. Our method mirrors the definition. When we depict the premises on the three-circle diagram, we’re drawing a picture of what it looks like for the premises to be true. Then we ask, about this picture—which shows a world in which the premises are true—whether it forces us to accept the conclusion—whether it depicts a world in which the conclusion must be true. If it does, the argument is valid; if it doesn’t, then it is invalid. The method follows directly from the definition of validity.
Example 2: Testing AII-3 for Validity
To further illustrate the method, we need to do some more examples. AII-3 will be a useful one. The mood tells us it’s going to look like this:
All __ are __.
Some __ are __.
/∴ Some __ are __.
And we are in the third figure, which looks like this:
MP
MS
SP
So we fill in the blanks to get the schematic form for AII-3:
All M are P.
Some M are S.
/∴ Some S are P.
Step 1: We start the test of this form with the blank three-circle diagram:
Step 2: We depict the premises. And here, our rule of thumb applies: depict universals before particulars. The major premise is a universal (A) proposition; the minor premise is a particular (I). So we depict the major premise first. That’s All M are P. We did this already. Recall that our first example (AAA-1, Barbara ) has the same major premise. So depicting that on the diagram gives us this:

Next, the minor premise: Some M are S. With particular propositions, we depict them using an X to indicate the thing said to exist. This proposition asserts that there is at least one thing that is both M and S:
We need to transfer this to the three-circle diagram. We need an X that is in both the M and S circles. If we look at the area of overlap between the two, we see that part of it has been shaded out as the result of depicting the major premise, so there’s only one place in the overlap between M and S for the X to go:

We’re done with Step 2: the premises are depicted. So we proceed to step 3 and ask, “Does this picture guarantee the conclusion?” The conclusion is Some S are P; that’s an assertion that there is at least one thing that is both S and P. Is there? Yes! That X that we drew in the course of depicting the minor premise is in the sweet spot—the area of overlap between S and P. It guarantees the conclusion. The AII-3 form is valid.
Note: If you’re curious, the mnemonic nickname for AII-3 is ‘Datisi’. Weird, it was the Middle Ages.
Understanding the Rule of Thumb
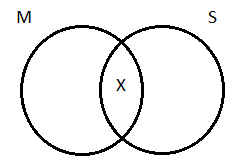
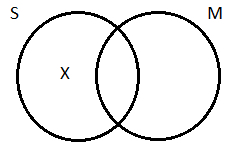
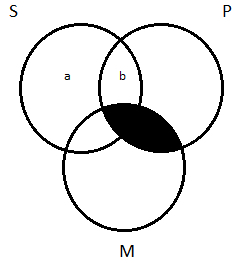
We’ve just seen another successful use of the Venn diagram test for validity, but it’s important to go back and revisit some of it. We need to reflect on why we have the rule of thumb to depict universal premises before particular ones. Remember, we had the universal major premise All M are P and the particular minor premise Some M are S. The rule of thumb had us depict them in that order. Why? What would have happened had we done things the other way around? We would have started with a blank three-circle diagram and had to depict ‘Some M are S on it.’ That means an X in the area of overlap between M and S. That area, though, is divided into two sub-regions, labeled ‘a’ and ‘b’ in this picture:
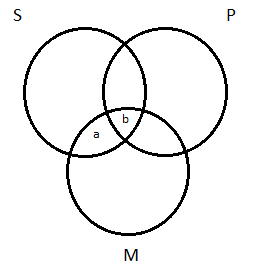
Where do I put my X—in region a or b? Notice, it makes a difference: if I put the X is region a, then it’s outside the P circle; if I put it in region b, then it’s inside the P circle. The question is: Is this thing that the minor premise says exists a P or not a P?
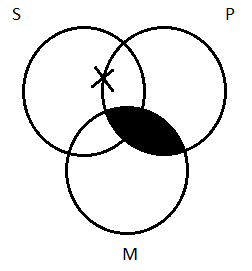
I’m depicting a premise that only asserts ‘Some M are S.’ That premise says nothing about P. It’s silent on our question; it gives us no guidance about how to choose between regions a and b. What to do? This is one of the cases of indeterminacy
that we mentioned earlier when we introduced a convention to keep in mind when running the test for validity: In cases of indeterminacy, draw Xs straddling boundary lines. We don’t have any way of choosing between regions a and b, so when we draw our X, we split the difference:
This drawing indicates that there’s an X in there somewhere, either inside or outside the P circle, we don’t know which.
Now we can understand the reason for our rule of thumb—depict universals before particulars. Look at what happens when we proceed to depict the universal premise ‘All M are P’ with the appropriate shading:
The shading erased half our X. That is, it resolved our question of whether or not the X should go in the P circle: it should. So now we have to go back and erase the half-an-X that’s left and re-draw the X in that center region and end up with the finished diagram we arrived at earlier:
We would have saved ourselves the trouble had we just followed the rule of thumb to begin with and depicted the universal before the particular—shading before the X. That’s the utility of the rule: sometimes it removes indeterminacy that would otherwise be present.
Check Your Understanding
Supplement Your Learning
You may walk through a step-by-step summary of Example 2 with this slide presentation: Venn Diagram Test for Validity – Example 2 . Link to it here or find it in the course table of contents at the end of Module 3. If you found the text description of this example complicated or confusing, scrolling through the slides at your own pace and reading each slide carefully may help clarify the Venn Diagram test for validity.
Example 3: Testing EOI-1 for Validity
Here’s one more example to illustrate how this method works. Let’s test EOI-1. Recall that in the first figure, the middle term is subject in the first/major premise and then predicate in the second/minor one. So we can quickly fill in the schematic form (we are getting good at this by now!):
No M are P
Some S are not M.
/∴ Some S are P.
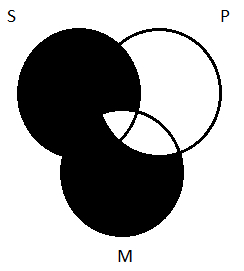
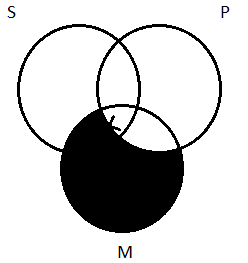
Following the rule of thumb, we depict the universal (E) premise first. No M are P asserts that there is nothing that is in both of those classes. The area of overlap between them is empty. With two circles, we have this:
Transferring this onto the three-circle diagram, we shade out all the area of overlap between the M and P circles (clipping off part of S along the way):
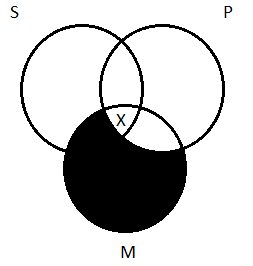
Next, the particular (O) premise: Some S are not M. This asserts the existence of something— namely, a thing that is an S but not an M. We need an X in the area of the S circle that is outside the M circle:
Moving this to the three-circle diagram, though, gets messy. The area of S that’s outside of M is divided into two sub-regions (labeled ‘a’ and ‘b’):
We need an X somewhere in there, but do we put it in region a or region b? It makes a difference: if we put it in region b, it is a P; if we put it in region a, it is not. This is the same problem we faced before. We’re depicting a premise—Some S are not M—that is silent on the question of whether or not the thing is a P. Indeterminacy. We can’t decide between a and b, so we split the difference:
That X may be inside of P, or it may not; we don’t know. This is a case in which we followed the rule of thumb, depicting the universal premise before the particular one, but it didn’t have the benefit that it had when we tested AII-3: it didn’t remove indeterminacy. That can happen. The rule of thumb is in place because it sometimes removes indeterminacy; it doesn’t always work, though.
So now that we’ve depicted the premises, we ask whether they guarantee the conclusion. Is the world depicted in our diagram one in which the conclusion must be true? The conclusion is Some S are P: it asserts that there is at least one thing that is both S and P. Does our picture have such a thing? There’s an X in the picture. Does it fit the bill? Is it both S and P? Well… maybe? That X may be inside of the area of overlap between S and P; then again, it may not be.
Oh my! What do we say? It’s tempting to say this: we don’t know whether the argument is valid or not; it depends on where that X really is. But that’s not the correct response. Remember, we’re testing for validity—for whether or not the premises guarantee the conclusion. We can answer that question: they don’t. For a guarantee, we would need an X in our picture that is definitely inside that middle region. We don’t have such an X. These premises leave open the possibility that the conclusion is true; they don’t rule it out. But that’s not enough for validity. For an argument to be valid, the premises must necessitate the conclusion, force it on us. These do not. The form EOI-1 is not valid. Any syllogistic form is invalid if its Venn diagram marks result in an X straddling an arc dividing two circles!
Check Your Understanding
Supplement Your Learning
You may walk through a step-by-step summary of Example 3 with this slide presentation: Venn Diagram Test for Validity – Example 3. Link to it here or find it in the course table of contents at the end of Module 3. If you found the text description of this example complicated or confusing, scrolling through the slides at your own pace and reading each slide carefully may help clarify the Venn Diagram test for validity.
